A detailed guide on how to forge your plots.
Congratulations on purchasing a plot! In this building and terramorphing tutorial you will learn the basics of how to master the building tools and get an introduction to the terramorphing engine. This tutorial is based on the following assumptions:
- You have a My Forge account.
- You own one or more plots of land.
- You have foraged the materials required to build.
- You want to learn the basics of building and terramorphing.
Every plot in “The Verse” is 20×20 meters of which not every square meter is buildable. This is because players should always be able to move between plots of different owners. If you’re lucky enough to own more plots close together (2×2, 3×1 or even 3×3) you can build across the plot borders of the plots you own.

Lesson 1: Materials
You need materials for every asset. In the right-bottom corner of every asset you can see what you need to forage to be able to build the asset. For instance: a “Wooden Foundation” asset will cost you 5 Wood (regular) and 2 Copper (shown below) to build. You will see more of this in the next lesson.
The amount needed and type of materials will differ for each asset to be constructed. We can see all the materials we currently have in our inventory. You can get to the inventory by clicking the Inventory button at the bottom right of the screen.

Once clicked you should see the inventory screen and we need to make sure we have some copper and wood (in red boxes) in the inventory to build the Wooden Foundation asset.

Lesson 2: Building Menu and Assets
First lets go over the action tool bar. It’s located at the bottom of the screen and will let you control building and vulcanite actions.
To be able to open the building menu, you need to swap the action bar from vulcanite controls to build controls.
Press ‘X’ or press the following icon in the action bar on the bottom of your screen.
Now the BUILD action bar appears. This bar consists of several options.
- Walk Mode: Allows you to freely move around without altering anything.
- Build Mode: Allows you to replace assets on your plots.
- Terrain Mode: Allows you to raise or dig the ground on your plots.
- Paint Mode: Allows you to apply different textures to terramorphed land.
- Water Placing Mode: Allows you to add and remove water from your plots.
Since this is a building tutorial, let’s focus on option 2. When option 2 is selected, a pop-up appears and the last used item pops up. The default item is always a foundation. To open the builder items menu, press Tab.
On the left side of this menu is a bar with types of items. They consist of for instance house-parts or furniture. We’ll get to the other items later, let’s start with building a foundation.
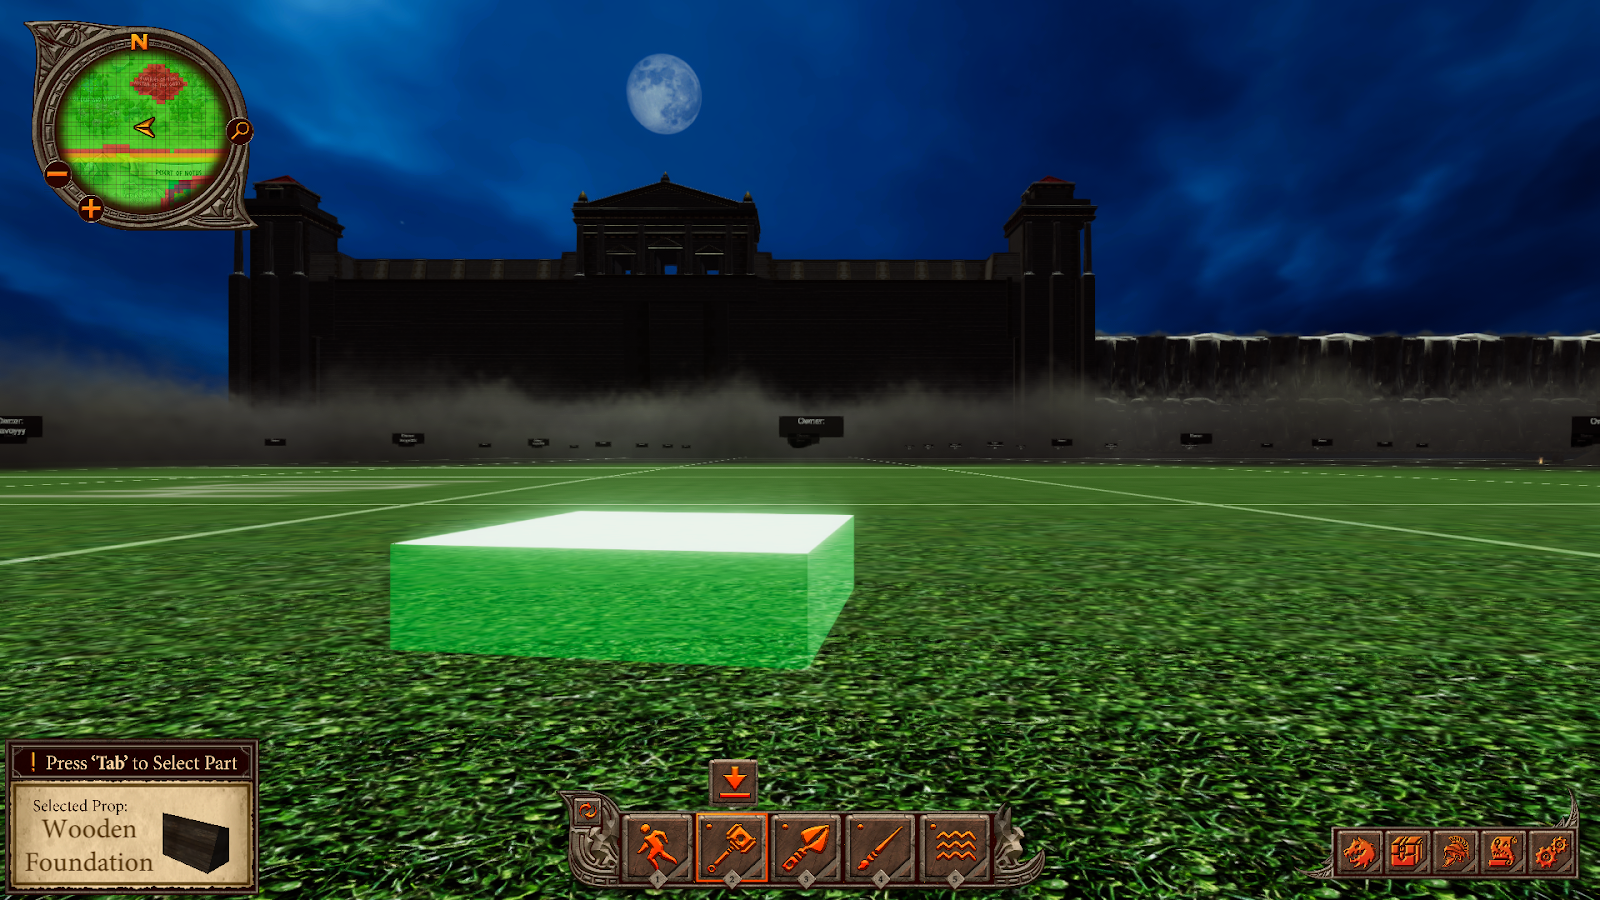
Lesson 3: Building a foundation
Click on this icon (left of screen), the building parts menu will appear. Items such as walls, doors and roofs will appear.
Choose the first item on the right, the “Wooden Foundation”. It should now look like this on your screen.
Without clicking the mouse you can move this foundation around on your land. You’ll notice that when you cross a border, the foundation turns red as you won’t be able to build there.
With the scroll wheel on your mouse you can turn the asset. When happy with the placement, you press the left mouse button and the asset is built.
If you want to delete the asset that has been placed, you can press “2” on the keyboard or click the “2” button on the action bar again. This will activate deconstruction mode. Aim with your mouse for the foundation. It will turn red and after clicking the left mouse button it’s deleted and the materials returned to your inventory.
Pressing “2” on your keyboard again gets you back into building mode. The great thing about building foundations is that the next foundation is automatically aligned with the first. So just point to the side of the first foundation where you want to put the second part, press the left mouse button and it’s perfectly aligned with the first. Your foundation should look something like this.
Lesson 4: Building walls
Now we’re happy with the foundation, let’s build some walls. Assuming you still have the foundation selected, press ‘Tab’. The build menu appears and we should be in the house-building selection.
If not, press the following button on the left. It’s for walls, doors, roofs, etc.
There’s quite a variation in walls, even at level 1. But every house needs a door(way) so let’s select that first. The building in The Verse works really easy, it’s like virtual Lego. You can place the doorway (or any other type of wall) on every border of every foundation you just built. So all around, but also on the border of the two foundations. If the doorway pops up green, you can place it, if it’s red you can not.
PRO TIP: When trying to place wall, hover over the CENTER of the space if would fill to see the green silhouette.
When you’re happy with the placement we can add some more walls, just like we did with the doorway. Press ‘Tab’ to open the menu, select the wall you like and place it. Some walls have a window, sometimes with a window sill. With the scroll wheel on your mouse you can turn the wall 180 degrees to your liking.
When you build all the walls, your building should look something like this.
Lesson 5: Placing a roof
What building is complete without something to keep the rain out of? Open the building menu (Tab) and scroll down to the different type of roofs.
Every roof part covers one foundation block and there are two types:
- Single parts (the flat roof and the roof cap)
- Connecting parts (to create a sloping roof)
The single parts are quite easy to place. Select for example the flat roof and point to the location you want to put it. It’ll turn green if it’s possible to place the roof, or red if it isn’t possible.
This is what it should look like with one roof in place.
For the purpose of this tutorial, we’ve deleted the flat roof and selected one of the sloping roof parts.
These roof parts can be turned around to make them connect in the middle. So place the part to your desire and with the mouse wheel you can turn the other part to make it connect.
After finishing the roof, your build could look like this.
Lesson 6: Save your build
To save this masterpiece for eternity, you should save it. Saving the changes will commit your changes to the blockchain and afterwards there is no way to undo the action. However, when prompted to save you can always choose NO to have your plot revert to it’s previous state.
In the screen above press ‘X’ or the switch menu icon.
A pop-up appears which to save (or not save) the changes you’ve made. You will of course choose ‘Yes’.
Lesson 7: Building accessories
Now you’ve built a building, it’s time to add accessories to your plot. Before we start, there is a distinction to be made between two types of accessories. The first type are accessories that can only be placed on a foundation or on a wall (red square), the second type can only be placed on your plot (green square).
We’ll work our way from the top, so we start with the wall-mounted accessories.
Wall-mounted
At this level you can choose from a limited range of wall-mounted accessories. The higher your level the more assets become available.
In the Building Menu press the second icon on he left and this list appears.
Select the torch and aim for the wall on which you want to mount it. The torch will turn green when it can be placed, or stays red when it can’t. When placed the torch should look like this.
These wall mounted accessories can be placed on either side of a wall, so you can also light up your interior or place some shelves on the outside. It’s up to you.
Furniture
Select the third icon and the list of furniture items appears.
Select one of the items, we’ll go with a chair. As before, when the item can be placed, it’ll turn green. You might have noticed by now you can’t place this item on the ground of your plot, but only on a foundation. Using the scroll wheel of your mouse you can rotate the item to your desire. When you’re happy with the placement and the chair turns green, you can place it.
This way you can fill your building with the nicest furniture level 1 has to offer.
Outdoor accessories
Besides decorating your building, you can also place a wide variety of items on your plot.
Click the fourth icon in the building menu and the list of items pops up.
Put a campfire next to our building. Select it from the list. Remember, these items can only be placed on the plot itself, not on a foundation. When the item turns green you can place it, it stays red when you can’t. You can use the scroll wheel to rotate them and decorate your plot to your liking.
Trees and plants
Every quadrant you can plant some type of trees or other type of vegetation to create a more natural feel, or to create your dream garden.
Select the fifth icon from the building menu. The list of items appears.
Select one of the assets, a bush for instance. Of course, these can only be placed on your plot, not on a foundation. When happy with the placement, plant your bush.
Notice that you can’t plant your bush or tree really close to the plot border or close to other items on your plot. The asset will turn green when its surface doesn’t interfere with surfaces of other assets. Too close to the border of your plot and you will see this.
Place it more inside the border and away from other assets and you might end up with something like this.

The act of manipulating the land in the verse is known as terramorphing. This tool lets you add and remove land.
The third option in the action bar changes you to add/dig mode.
When you’re terramorphing, you’ll see a pop up box in the lower left hand screen that looks like the following box and allows a custom height and depth to set the land to. At level 1 the max height is +/- 3. As your land’s level increases you will see this increase too.
This lets you set the height level you wish to add land up to.
When you press ‘3’ again or click the same button, it’ll change to dig mode.
The values represent how high you can add and how deep you can dig. To change the values, use the ‘+’ and ‘-’ keys. Note: You can hold down the keys to increase the value instead of pressing it a bunch of times.
While in terramorphing mode, hovering your cursor over your land will give that spot a yellow glow. You’ll also notice that the screen as a whole lights up to give you the perfect view of your plot.
If you click this spot while in Add, it will build the ground up with one block/increment.
If you click a flat spot while in Dig, it will dig out a spot with one block/increment.
Now if you combine these two, you can make some really cool builds. The possibilities are endless and with a little time you can make your way in to the master builders circles. Check out some of these builds from VulcanVerse Alpha.